Introduction
Developers who have modified open-source software know that modified packages need to be distributed for installation. The most efficient approach is to build a dedicated package repository, which integrates with system package managers and ensures timely updates. Examples are Arch Linux’s ArchCN and Debian’s PPA (Personal Package Archive).
Traditional repository setups often require complex tools or systems like Open Build Service (OBS). However, this guide focuses on lightweight methods suitable for distributing self-maintained packages.
While this article specifically covers Debian .deb packages, the principles can be adapted to other package management systems.
Core Idea
Use reprepro to create a software repository. After packaging your software, import it into the repository using reprepro. Host the repository via HTTP (e.g., GitHub Pages) to make it publicly accessible.
Direct Method
GitHub Pages provides free static site hosting. You can host your repository as a Git repository on GitHub and use GitHub Pages to serve it. For setup details, refer to SetupWithReprepro. Below are the simplified repo setup steps using reprepro:
Key Steps:
Generate a GPG signing key:
1gpg --gen-keyGet the private key fingerprint (e.g.,
9FCD68DE8EFE8EC94ABEFDCB4FC5CF6FC16FDEF3):1 2 3 4 5$ gpg --list-secret-keys sign@example.com sec ed25519 2025-05-17 [SC] [expires: 2028-05-16] 9FCD68DE8EFE8EC94ABEFDCB4FC5CF6FC16FDEF3 uid [ultimate] Signing bot <sign@example.com> ssb cv25519 2025-05-17 [E] [expires: 2028-05-16]Export the public key for users to verify signatures:
1gpg --export --armor 9FCD68DE8EFE8EC94ABEFDCB4FC5CF6FC16FDEF3 > public.keyCreate repository directories:
1
2
mkdir -p /path/to/your/repo mkdir -p /path/to/your/repo/confConfigure
/path/to/your/repo/conf/distributions:1 2 3 4 5 6 7 8 9Codename: <release-name> Suite: <release-pseudonym> Architectures: source i386 amd64 <...> Components: main <...> Contents: SignWith: <fingerprint> Origin: <Your project name> Label: <Your project name> Description: <Your project description>For configuration details, see Configure reprepro.
Create
/path/to/your/repo/conf/options:1 2 3 4 5 6 7 8 9 10 11 12 13cd /path/to/your/repo # Calling reprepro will behave normally at first... reprepro ... # ... set some default options ... cat > conf/options <<EOF verbose ask-passphrase EOF # ... now it acts like you called `reprepro --verbose --ask-passphrase`: reprepro ...Build
.debpackages.Add packages to the repository. Choose one from the following two methods according to your case.
Use
.changesfiles:1reprepro -b /path/to/your/repo include <release-name> <package>.changesUse standalone
.debfiles:1reprepro -b /path/to/your/repo includedeb <release-name> <package>.deb
Use
--ignore wrongdistributionif package codename mismatches.Commit the repository to Git and push to GitHub.
Enable GitHub Pages for the repository branch. Users can then add your repository with:
| |
Replace placeholders accordingly.
Workflow Method
Given the simplicity and clarity of the aforementioned method, one might inquire as to the necessity of this particular section. Ah, a closer examination of GitHub’s single-file repository limits reveals the underlying reason. Specifically, when a single file within a repository exceeds 100MB—a common occurrence with larger software packages—the adoption of Git LFS becomes imperative for its hosting. However, Git LFS also imposes free tier limitations. Upon exceeding 1GB of usage, one is compelled to either upgrade their membership or acquire additional data packages. In essence, the cost-effectiveness of this approach is, in my estimation, rather unfavorable. (The author, regrettably, did incur these expenses for a few months.)
To circumvent this predicament, it becomes necessary to address the issue of directly hosting software packages within the repository. A highly pragmatic solution involves leveraging GitHub Releases for the hosting of compiled software packages. (Previously, a lapse in judgment led to the use of GitHub Pages.) One might ponder, if GitHub Pages were already in use, whether it would not be feasible to import packages within the workflow during site creation, thereby establishing the repository. After all, GitHub Actions’ free runner machines and GitHub Pages’ size limitations are demonstrably more lenient than those of Git LFS.
Whence, then, do these software packages originate? This question, naturally, invites diverse perspectives. However, from the vantage point of the repositories I currently maintain, the source code repositories requiring packaging reside on GitHub and are already configured with build and test CI. Consequently, extending these with a distribution CD process represents a logical progression. Thus, my current architectural design entails organizing the software packages subsequent to their test build, followed by the implementation of two distinct strategies:
Publishing the software packages to GitHub Releases. This approach offers the advantage of not consuming GitHub Pages bandwidth and provides users with a straightforward and intuitive download experience. Distributing them to a sub-path on the current account’s GitHub Pages, named after the software. Indeed, each software package’s code repository will also generate a corresponding GitHub Pages site. This yields two principal benefits:
1. Subsequent repository build processes can directly retrieve the packages from this sub-page.
1. The build artifacts of the test workflow are no longer subject to temporal expiration, but are instead persistently maintained by GitHub Pages. (Though publication via GitHub Release also offers persistence.)
Workflow Methodology
Given the simplicity and clarity of the aforementioned method, one might inquire as to the necessity of this particular section. Ah, a closer examination of [GitHub’s single-file repository limits] reveals the underlying reason. Specifically, when a single file within a repository exceeds 100MB—a common occurrence with larger software packages—the adoption of Git LFS becomes imperative for its hosting. However, [Git LFS also imposes free tier limitations]. Upon exceeding 1GB of usage, one is compelled to either upgrade their membership or acquire additional data packages. In essence, the cost-effectiveness of this approach is, in my estimation, rather unfavorable. (The author, regrettably, did incur these expenses for a few months.)
To circumvent this predicament, it becomes necessary to address the issue of directly hosting software packages within the repository. A highly pragmatic solution involves leveraging GitHub Releases for the hosting of compiled software packages. (Previously, a lapse in judgment led to the use of GitHub Pages.) One might ponder, if GitHub Pages were already in use, whether it would not be feasible to import packages within the workflow during site creation, thereby establishing the repository. After all, [GitHub Actions’ free runner machines] and [GitHub Pages’ size limitations] are demonstrably more lenient than those of Git LFS.
Whence, then, do these software packages originate? This question, naturally, invites diverse perspectives. However, from the vantage point of the repositories I currently maintain, the source code repositories requiring packaging reside on GitHub and are already configured with build and test CI. Consequently, extending these with a distribution CD process represents a logical progression. Thus, my current architectural design entails organizing the software packages subsequent to their test build, followed by the implementation of two distinct strategies:
- Publishing the software packages to GitHub Releases. This approach offers the advantage of not consuming GitHub Pages bandwidth and provides users with a straightforward and intuitive download experience.
- Distributing them to a sub-path on the current account’s GitHub Pages, named after the software. Indeed, each software package’s code repository will also generate a corresponding GitHub Pages site. This yields two principal benefits:
- Firstly, subsequent repository build processes can directly retrieve the packages from this sub-page.
- Secondly, the build artifacts of the test workflow are no longer subject to temporal expiration, but are instead persistently maintained by GitHub Pages. (Though publication via GitHub Release also offers persistence.)
GitHub Release-Based Approach
Key Components of the Packaging Workflow
Let us again consider kernel_sony_sm8250 as an illustrative example.
| |
Initially, the current version number must be extracted from debian/changelog. Within this project, the changelog version is generated by releng-build-package (which reuses gbp’s build script). Distinct matching rules apply for different version generation methodologies. The subsequent release will utilize this version number as its tag.
The process then proceeds with the upload and related operations.
Key Components of the Software Repository Build Workflow
Here, we shall use this version of custom-debs as an example.
| |
Herein, the project names from which .deb packages are to be retrieved from releases are first read from package_repos. These names adhere to the <owner>/<repo> format, with each repository listed on a separate line.
Subsequently, the repository’s various attributes are configured based on environment and secret variables.
To employ this workflow, the following variables necessitate definition:
Workflow Environment Variables
1 2 3 4env: CODENAME: trixie COMPONENTS: main ARCHITECTURES: "arm64"Project Secret Variable
SIGNING_KEY. This variable can be populated withinProject Settings > Security > Secrets and variables > Actions. (It can be exported viagpg --export-secret-keys -a <fingerprint>.)Modification of GitHub Pages Default Branch Protection Rules:
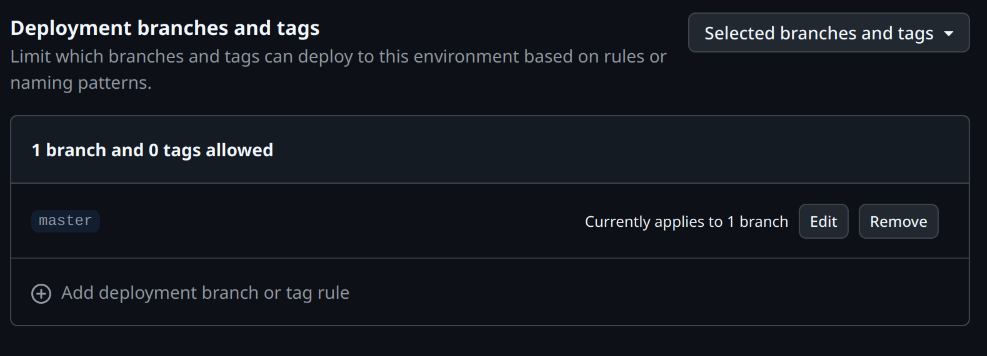
Within
Project Settings > Environments > github-pages (click to access configuration page) > Deployment branches and tags, adjust the branches or tags permitted for deployment.
The configuration appears approximately as follows:
GitHub Pages-Based Approach (Deprecated)
From Droidian Sony Pdx206 Kernel Repository:
| |
This section uses the releng build tool provided by Droidian (which I later discovered is part of the gbp/Git Build Package toolchain) for packaging. For regular Debian packages, you can also use dpkg-buildpackage directly. The major difference between these two methods is that, releng will use git informations as version name while dpkg-buildpacakge will strictly follow the version name recorded in debian/changelog. Signing during this stage is optional since packages will be signed together during repository import stage.
| |
This step generates a directory listing page to display build artifacts when accessing the repository subpath directly.
Repository Build Workflow Example
This process is significantly simpler than manual repository setup thanks to the pre-existing morph027/apt-repo-action@v3.6 workflow. You only need to:
Configure essential parameters:
Set repository metadata in workflow environment variablesHandle cryptographic signing:
Store your private GPG key in GitHub Secrets (SIGNING_KEY)Key distribution:
Export the public key using:1gpg --export --armor [fingerprint] > public.key
Replace
fingerprintwith the actual one of your public key.
Workflow from ArchieMeng/custom-debs:
| |
To properly use this workflow, you must configure these essential elements:
Workflow Environment Variables
1 2 3 4env: CODENAME: trixie COMPONENTS: main ARCHITECTURES: "arm64"Repository Secret Configure the GPG signing key via:
Project Settings > Security > Secrets and variables > Actions- Secret name:
SIGNING_KEY - Value: ASCII-armored GPG private key (export with
gpg --export-secret-keys -a <fingerprint>)
- Secret name:
GitHub Pages Deployment Rules Update branch protection settings with
Project Settings > Environments > github-pages > Deployment branches. Adjust deployment rules to match your workflow requirements:It should be like this:
Conclusion
These are the two methods I’ve used for setting up simple software repositories on GitHub. If you don’t need to distribute very large packages or lack a dedicated package build workflow, the first, simplest, and most direct method is suitable. However, if you’re like me and need to distribute large packages and have a complete build and distribution workflow, you might consider trying the second method, which is entirely workflow-based.
Naturally, these methods aren’t without their limitations. For instance, the process of managing packages within these self-hosted repositories doesn’t inherently handle inter-package dependencies. But for small repositories of this size, this situation typically isn’t a concern. :)